In Edifact messages, there is a Control Number in the header to be able to check for duplicates and/or check for sequence if the sequence of messages is of importance.
Normally, a control number is a number value that increments with one for each Edifact document sent between two partners. In Sterling B2B Integrator there is a standard setup for Control Numbers where you set a number value, and a Sender ID and Receiver ID. And then connects that Control Number configuration to your Edifact Envelope. Then the Control Number will increment by one for each message Enveloped.
But some times, someone is a bit creative when it comes to Control Numbers. A while back I was asked if it was possible in Sterling B2B Integrator to create a Control Number on the format YYYYMMDDNN, where YYYYMMDD is today’s date, and where NN is an incremental value that should be reset to 01 every new date.
Everything is possible, and this can be done in multiple ways. Some better than others.
I came up with three possible solutions.
- One alternative is to do some kind of String replace after the Edifact Document is enveloped and ready for sending. But you would need to store the incremented Control Number somewhere to know what next number should be. some kind of Database in other words. And this does not use the standard Control Number logic in Sterling B2B Integrator, so it creates a need for customizing a standardized process.
- It would be preferable to use the standard Control Number logic since that is linked directly to the enveloping in Sterling B2B Integrator. The Control Number itself is stored in the SB2BI Database. So this number has to be updated in some way every night. There is two ways of updating this:
- Use JDBC Adapter to do an SQL directly to the Database. This works, but as mentioned before, it is absolutely not recommended to do any SQL that alters the database in Sterling B2B Integrator since that might end up in tears. Even though the Control Number Table is pretty straight forward.
- Use SB2BI standard Export/Import functionality to export the Control Number, update the number in the Export XML file and import it again. This is my preferred method since it is using the Standard Control Number functionality in SB2BI, and thus not creates any need for making special processing for certain partners. And it is using Standard Export/Import functionality that handles business logic when communicating with the Database.
So I will now show an example of this method of creating a Customized Control Number.
Create a Control Number
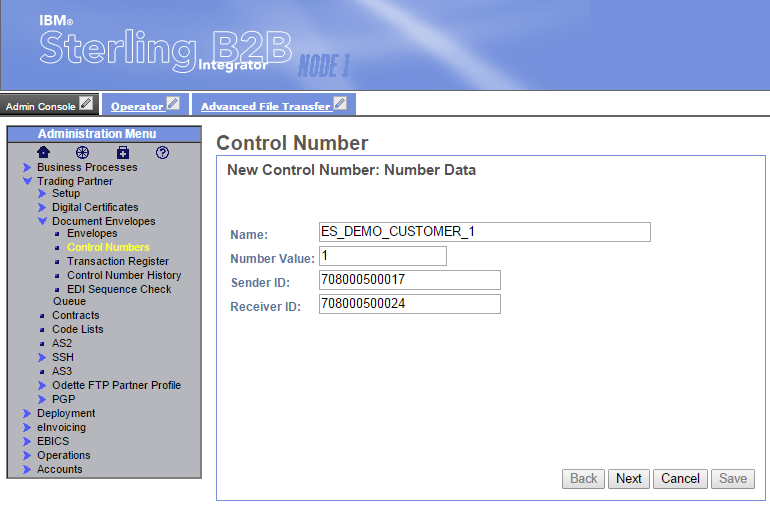
The first thing I do, is to create a Control Number for my Demo Customer.
 The number value in this Control Number is not of importance, since it will be updated to fit YYYYMMDDNN later on anyway.
Business Process and Prerequisetes to update Control Number
I will update the Control Number, that now is created, by using a Business Process. This Business Process will run an Export of the Control Number, and then update the Control Number value before it imports the Control Number again. But there are some Prereqisites that need to be in place before creating the Business Process itself.
Security Context
When using Export/Import functionality in the GUI, the user is setting a Password when exporting, that has to be used again when importing to avoid unauthorized import of artifacts. But when using Export/Import through the Graphical Process Modeler, this authentication needs to be done in a different manner. Sterling B2B Integrator has a Security Context Utility, that is used to create authorization when automating Export/Import. So I need to start by creating a Security Context.
Security Context is created by using a script. I go to the <SB2BI Install Dir>/install/bin/ folder. There I will find a securityContext.sh file. This script can be used to set, get or list Security Contexts. When setting a Security Context, the script takes 3 values. Context, Identity and Passphrase.
I now have a Security Context stored that will handle the authentication when Exporting and Importing the Control Number.
Input XML File
The Export Service takes an XML file as input. This XML file tells the Export Service what to Export.
<?xml version="1.0" ?>
 <ExportConfiguration>
   <OutputFormatType>XML Document</OutputFormatType>
   <ExportResourcesBasedOnTagName>No</ExportResourcesBasedOnTagName>
   <ExportType>Standard</ExportType>
   <Resources>
       <Resource>
          <Name>Control numbers</Name>
          <PatternSet>
            <include>ES_DEMO_CUSTOMER_1</include>
          </PatternSet>
     </Resource>
   </Resources>
   <Passphrase>
      <SecurityContext>CtrlNoUpd</SecurityContext>
      <SecurityIdentity>Demo_Customer_1</SecurityIdentity>
      <ExportCertificate>Yes</ExportCertificate>
   </Passphrase>
</ExportConfiguration>
This XML file needs to be stored somewhere accessible for Sterling B2B Integrator. This can be at a shared File System or in a Mailbox. I chose to store it in a Mailbox since that allows to let the file be there after picking it. A File System Adapter will pick, and delete the file, and then I would need to write the file back again to have it there the next day.
 Business Process
Then I am ready to build the Business Process itself. The Business Process will perform the following steps:
- Get the XML Input File from the Mailbox by running a Mailbox Query Service to find the MessageID and then a Mailbox Extract Begin Service to Extract the file.
- Run a Timestamp Utility Service to get today’s date on the format YYYYMMDD
- Run the Export Service to fetch the Control Number I am going to update
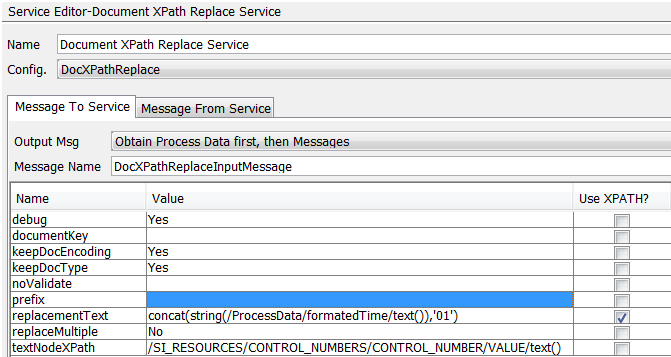
- Run a Document XPath Replace Service to replace the existing Control Number value with the new value concatenation of YYYYMMDD+01
- Run Import Service to import the updated Control Number to the Database
The BP looks like below:
<process name="default">
  <sequence name="Sequence Start">
    <operation name="Mailbox Query Service">
      <participant name="MailboxQuery"/>
      <output message="MailboxQueryServiceTypeInputMessage">
        <assign to="." from="*"></assign>
        <assign to="MailboxPath">/InputFiles</assign>
        <assign to="MessageExtractable">YES</assign>
        <assign to="MessageNamePattern">ControlNumberExport.xml</assign>
      </output>
      <input message="inmsg">
        <assign to="." from="*"></assign>
      </input>
    </operation>

    <operation name="Mailbox Extract Begin Service">
      <participant name="MailboxExtractBegin"/>
      <output message="MailboxExtractBeginServiceTypeInputMessage">
        <assign to="." from="*"></assign>
        <assign to="CommitNow">YES</assign>
        <assign to="MessageId" from="/ProcessData/Message/MessageId/text()"></assign>
      </output>
      <input message="inmsg">
        <assign to="." from="*"></assign>
      </input>
    </operation>

    <operation name="Timestamp Utility">
      <participant name="TimestampUtilService"/>
      <output message="TimestampUtilServiceTypeInputMessage">
        <assign to="." from="*"></assign>
        <assign to="action">format</assign>
        <assign to="baseTime">now</assign>
        <assign to="format">yyyyMMdd</assign>
      </output>
      <input message="inmsg">
        <assign to="." from="*"></assign>
      </input>
    </operation>

    <operation name="Export Service">
      <participant name="ExportService"/>
      <output message="ExportTypeInputMessage">
        <assign to="." from="*"></assign>
      </output>
      <input message="inmsg">
        <assign to="." from="*"></assign>
      </input>
    </operation>

    <operation name="Document XPath Replace Service">
      <participant name="DocXPathReplace"/>
      <output message="DocXPathReplaceInputMessage">
        <assign to="." from="*"></assign>
        <assign to="debug">true</assign>
        <assign to="keepDocEncoding">true</assign>
        <assign to="keepDocType">true</assign>
        <assign to="replacementText" from="concat(string(/ProcessData/formatedTime/text()),'01')"></assign>
        <assign to="replaceMultiple">false</assign>
        <assign to="textNodeXPath">/SI_RESOURCES/CONTROL_NUMBERS/CONTROL_NUMBER/VALUE/text()</assign>
      </output>
      <input message="inmsg">
        <assign to="." from="*"></assign>
      </input>
    </operation>

    <operation name="Import Service">
      <participant name="ImportService"/>
      <output message="ImportTypeInputMessage">
        <assign to="." from="*"></assign>
        <assign to="Context">CtrlNoUpd</assign>
        <assign to="Identity">Demo_Customer_1</assign>
        <assign to="KeepExistingControlNumbers">NO</assign>
      </output>
      <input message="inmsg">
        <assign to="." from="*"></assign>
      </input>
    </operation>

  </sequence>
</process>
When running the Export Service, the Control Number will be fetched as an XML file like below.
<?xml version="1.0" encoding="UTF-8"?>
<SI_RESOURCES xmlns="http://www.stercomm.com/SI/SI_IE_Resources" xmlns:xsi="http://www.w3.org/2001/XMLSchema-instance" GISVersion="6000" FrameworkVersion="2">
	<CONTROL_NUMBERS>
		<CONTROL_NUMBER>
			<CONTROL_NUMBER_ID>60526014bc0be6b50node1</CONTROL_NUMBER_ID>
			<EXTERNAL_OBJECT_ID></EXTERNAL_OBJECT_ID>
			<NAME>ES_DEMO_CUSTOMER_1</NAME>
			<SENDER_ID>708000500017</SENDER_ID>
			<RECEIVER_ID>708000500024</RECEIVER_ID>
			<VALUE>1</VALUE>
		</CONTROL_NUMBER>
	</CONTROL_NUMBERS>
</SI_RESOURCES>
Then I use a Document xPath Replace Service to search for the Control Number Value and replace it with my Timestamp and 01 like the configuration below.
 Then the Business Process imports that document again to the Database.
Testing the PROCESS
I uploaded the Business Process to Sterling B2B Integrator and ran it.
Prior to running the Business Process the Control Number was 1
 After running the Process the Control Number was sett to today’s date and 01 at the end.
 When enveloping Documents using this Control Number, the Control Number will be valid up to 99 documents a day.
To have this happen on a regular basis, just Schedule the Business Process to run every night right after midnight when the system date has changed.


0 comments on “Custom Control Number in Edifact” Add yours →